Years ago, many, many years ago, in fact, when I first started to get interested in nature photography, I had no idea photographers could actually enhance an image they were taking with just their cameras.
Much like most newbies to the world of photography, back then, I just thought we focused on the subject, pressed the shutter button, took the picture, and, for lack of a better term, “that was that”.
(Birdwatching T-shirts)

(Shop Bear River Blogger's Online Store)
I was in high school taking a basic photography class and, admittedly, my knowledge regarding the world of photographic imagery at the time was extremely limited, especially regarding how someone could soften or blur parts of the image to their liking, commonly referred to as bokeh.
Well, fast forward to today, several decades later, and I am here to tell you “that” isn’t necessarily “that”, as it were. What I have learned since my high school induction into the often complicated world of photography is we do indeed have a lot of control over our images, and it is fascinating, to say the least.
Now keep in mind, however, this early introduction to the world of photography was back in the day before the notion of digital-based cameras was even a vague idea in some inventor’s head, and image editing programs were, of course, as common as email addresses back then, none of which had even been invented yet. Yep, it was that long ago.
As such, the means by which I learned photography was kind of old-school, to say the least. A simple “SLR” camera, a hand-held light meter, and a roll of black and white film were the tools I had to work with back then. Cameras didn’t focus automatically like they do now and we had to manually forward the film after each shot as well as rewind it completely back into the metal cartridge when we were done.
There were no LCD screens on the backs of cameras or image editing software on laptops. There was no instant gratification for our efforts, but rather we literally had to wait a couple days or more for pictures to come back from the photo processing store. In time, one-hour photo processing arose and changed the photographers’ world for the better.
(Gosky Spotting Scope)
(As an Amazon Associate, I earn from qualifying purchases.)
We never figured it would go from days to hours to instantaneous results, as it is now, to see the fruits of our labors but it did. It most certainly did, but I will say those were the days to learn photography, I mean really learn photography. Those were the days, indeed, an era when a photographer had to really take his time to get the best shot possible because we just didn’t know how well we captured something until we saw it on paper later on.
In my high school class, I vividly remember taking the roll of film out of the camera and placing it in a small zippered cloth bag, thus allowing the film to be removed from its protective cylindrical shell in the dark.
We developed the film in a small canister with a concoction of several different kinds of chemicals and then, after a set amount of time in the canister, we took the newly developed roll of film into the darkroom and printed the images on special photography paper, dipped them in another strange liquid for a bit and, one by one, hung them up to dry, just like they did in the movies.
It was an incredible learning experience for me despite only achieving an average grade in the course, I will admit. Interestingly, after going through some old boxes the other day, I unearthed a bird photo taken as an assignment in my high school photography class. Judge it with kid’s glove, mind you, it was one of my very first photographs ever taken.
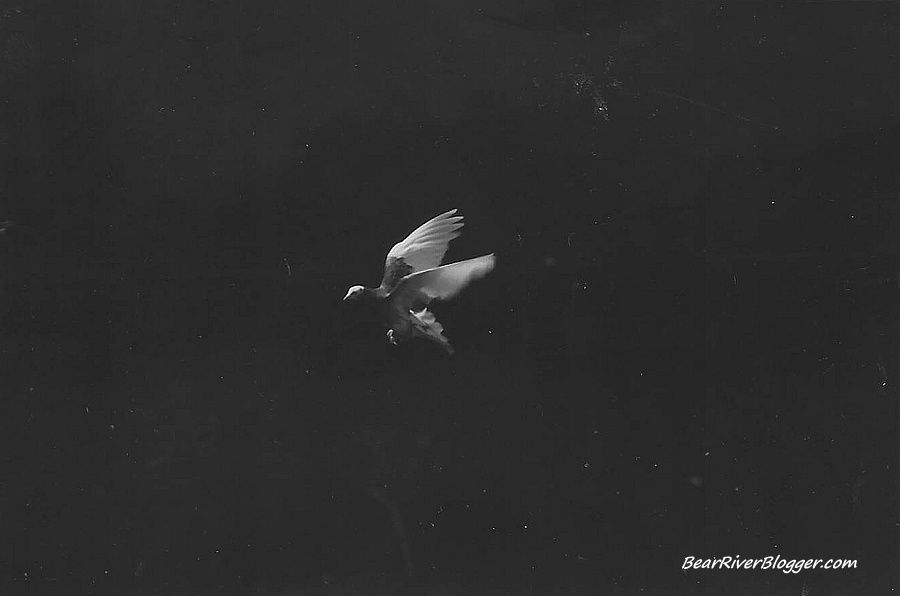
I did get good marks on the image for some unknown reason, but nevertheless, I promise the images do get better as this blog post goes along.
That semester, while spending part of my free time behind a camera, an interest in photography began to sprout, and, over the years since then, I finally learned how to take images that would be of great interest to others. It wasn’t until I purchased my first digital camera years ago, however, that my nature photography skills began to really grow and grow fast I might add.
But I would like to clarify something about digital cameras and photography before I go any further. It’s not the camera that makes the photographer, it’s the photographer that makes the photographer. My skills in photography grew because the new-found digital age allowed me to practice much more and learn at a faster rate than was at all possible with a film camera.
The camera, in and of itself, wasn’t the key, however. Being able to photograph so much more than I could have dreamed of with a simple film camera, a camera held back with the hindrances of time-consuming film and photo processing, was what helped me along my path.
Photography is photography, and it will always be, in fact. It is the same back then as it is today, and it will still be the same tomorrow, in essence, no matter what kind of camera you are using. The digital camera age didn’t change the concepts of photography, just the ease of utilizing them in our own artistic expressions.
Our modern, digitally based cameras only make the job easier and quicker, but that is all. The rest comes from understanding the basic principles of light and composition and how to capture it all correctly to achieve the desired results.
(Shop Bear River Blogger's Online Store)
(T-shirts, Hoodies, Greeting Cards, Blankets)
As you grow as an outdoor photographer, learning how to manipulate the image while actually taking the photo will allow for a more creative, more artistic photograph to be taken. Adding what many photographers call bokeh to your images can bring a sense of artistry, a sense of style to your photography that could really help you express what your photographs are trying to say.
The concept of bokeh is what I will be focusing on, no pun intended, with this blog post in hopes of helping you add it to your photography bag of tricks by showing you what it is and just how easy it is to use.
What is bokeh?
First and foremost, we need to define what bokeh actually is. In a manner of speaking, some refer to bokeh as “the way a lens renders out-of-focus points of light”. To put it a bit more plainly, however, bokeh is how the lens and camera blur the background and foreground of an image. Simple enough, isn’t it?
It’s an artsy term, for sure, and I have read many different definitions and explanations regarding bokeh, but for our intent here, it is the purposely blurred parts of the photo, both in front of and behind the subject.
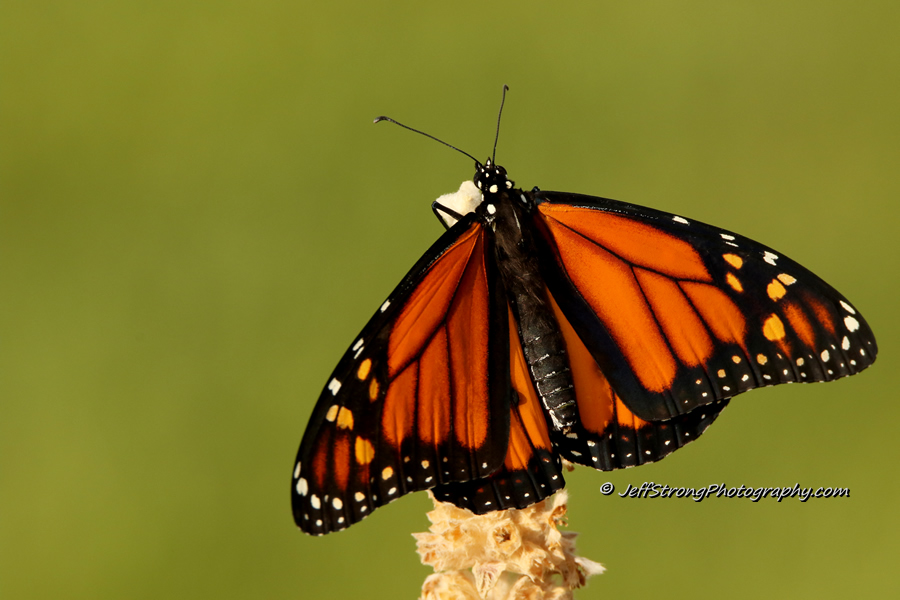
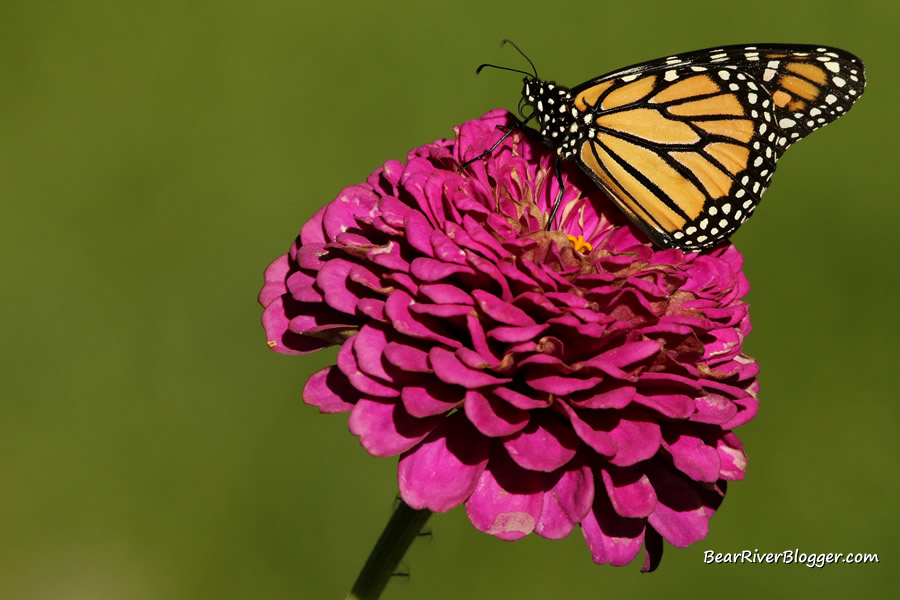
Take a look at this photograph that shows bokeh, the soft, blurred background, very well. I captured this monarch butterfly image a few years ago, and it’s an extreme case of blurring the background. The image hasn’t been altered in any way, and you will be surprised when you see what I actually used as the background.
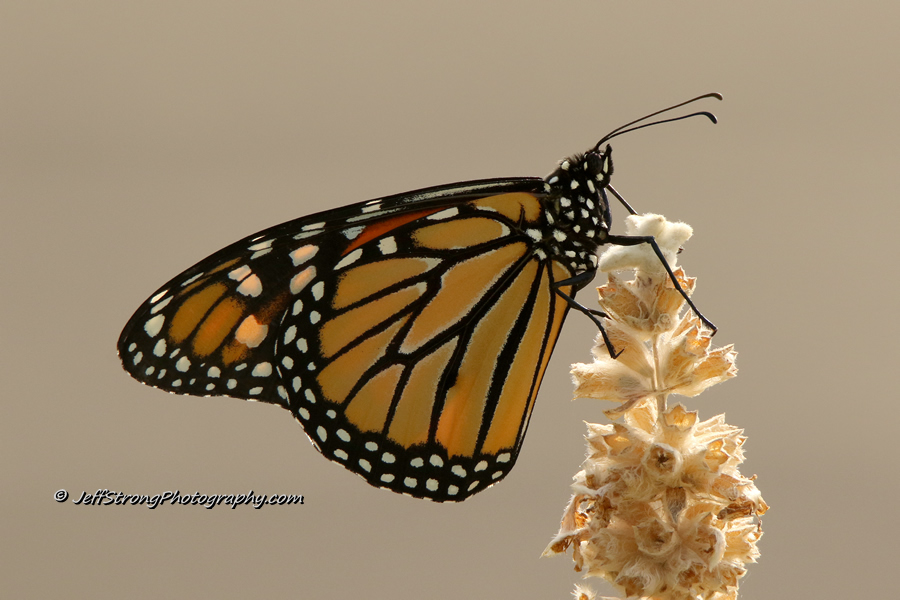
To illustrate the power you can have in-camera to enhance an image, take a look at this next photo which depicts the actual background used in the monarch butterfly image. It is an asphalt road in front of my house, and it was the only background I could use with the sun at my back so I tried to make the best of a less-than-perfect situation.
I honestly didn’t know what to expect, but I like trying new things to see what can I create, especially in unusual settings like this.
For illustrative purposes, I wanted to capture the background while shooting the image so I focused behind the butterfly for a quick shot. This gives you an idea of how much you can actually blur parts of your photographs and how you can greatly enhance an image with bokeh.
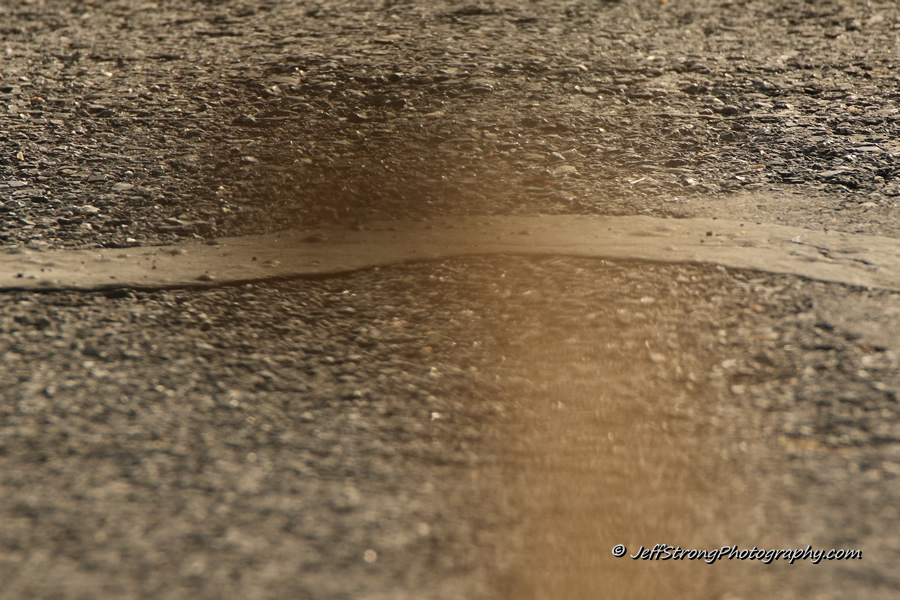
Bokeh allows you to take dull, ordinary, even dingy backgrounds, such as an asphalt road, for example, and transform them into soft, colorful palettes to stand behind and beautifully embrace your subject. It should be noted, however, there are varying degrees of bokeh and, when used correctly, they all have their time and place.
Why do we want to use bokeh?
Blurring parts of the image will, in effect, isolate the subject, helping it stand out in the photograph. As seen from the above monarch butterfly images, you can also use a wide variety of backgrounds, including some backgrounds not typically thought of as interesting or even useful, to enhance a subject and make it stand out.
Blurring the background is an artistic expression, of sorts, and gives the photographer a way to quickly convey what the image is about. The in-focus portion of the image, hence, the subject, stands out more with bokeh, and it immediately catches the eye of the viewer.
For example, when you look at the above butterfly image, you immediately know it is of a butterfly perched on a flower. Your eye is quickly drawn to the subject, and the soft background supports it very well.
Sometimes we really want to highlight and isolate the subject, completely smoothing over the background. This is an extreme case of the use of bokeh and one of my own personal favorites. It really makes the subject pop and stands out on its own.
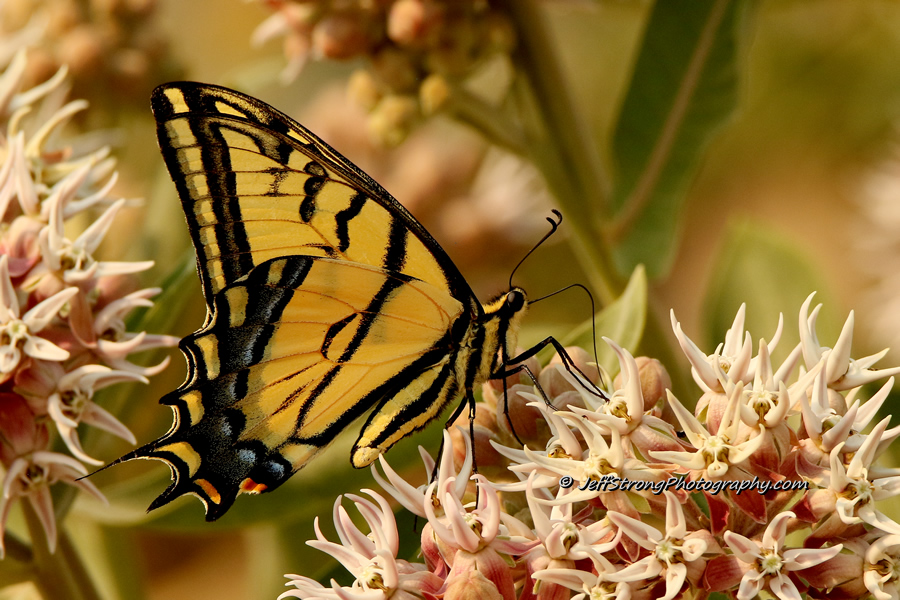
Other times, in contrast, we just want to soften the background a little bit, allowing it to help the subject tell the story. An example of this is one of my recent images of a swallowtail butterfly on milkweed. The butterfly is slightly isolated with a little bit of background blur, but the background isn’t completely smoothed over and helps tells the viewer about the scene.
As you can see, there are varying degrees of blurring parts of an image, and they all have their purpose. It just depends on what the photographer wants to say with the particular image. But just like with all things in life, there are two sides to every story, there is good bokeh and, of course, there is bad bokeh.
What makes good bokeh?
Simply put, good bokeh compliments the subject and doesn’t take your attention away from the main reason for looking at the image, the subject. The blurring around the subject, both the foreground and background, in essence, takes a back seat to the actual subject and supports it in some way.
Whatever parts are blurred are soft and non-distracting. There are no out-of-place shapes, lines, or blurbs of some kind. The image is just pleasant. It can have a lot of blurring or just a little bit, but either way, there should be no out of place or distracting parts to the blur.
What makes bad bokeh?
Bad bokeh is, of course, just the opposite, it’s quite distracting and makes the image busy or even a bit annoying to look at.
The blurring of the supporting parts of the image, the background and foreground, in this case, overpowers the subject and takes our attention away from it. It could be a distracting or unnatural shape or line or, more commonly, it is oftentimes a big blurb of some kind that just doesn’t belong.
Examples of good and bad bokeh.
It’s all up to the viewer, as well as the artist, however, to what is pleasing and what isn’t, but for me, personally, the smoother the background an image has the better. That doesn’t mean all images have to have super clean, smooth backgrounds, however, to be pleasing to my eye, not in the least.
It does mean, though, the blurred background shouldn’t take my attention away from the subject with distracting and unnatural shapes, lines, or poorly placed blurbs of light or darkness, any of which can and will inadvertently take the spotlight away from the subject.
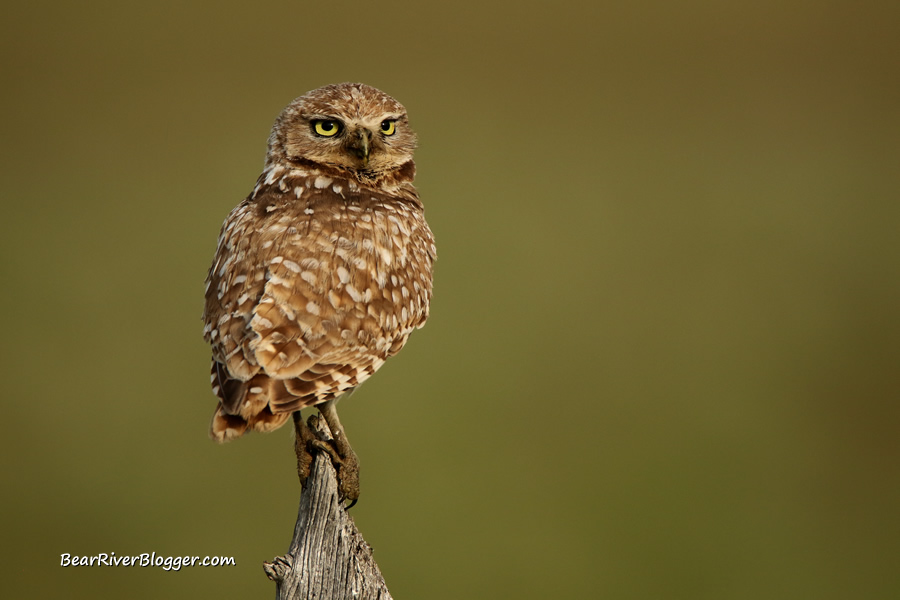
Let me show you what I mean. Here is a nice image of a burrowing owl, a good example of a soft blurred background that enhances and supports the subject. You look at this image and the first thing you notice is it’s an owl perched on a wooden fence post. Your eyes aren’t pulled away by distracting shapes, lines, or blotchy chunks of light. It is pleasing to the eye.
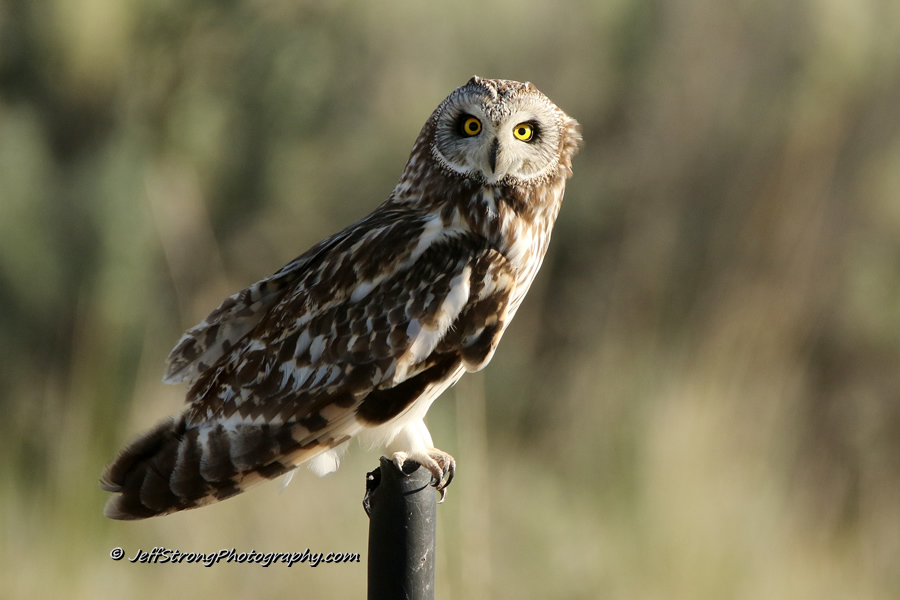
Conversely, this next image is a poor expression of blurring the background. It has a lot of distracting bits and pieces of dark and light spots with some very unnatural lines in the image. The background is blurred quite well but there are parts that are very distracting and, for me at least, these unnatural parts take away from the handsomely perched short-eared owl.
How do I create bokeh in my photos?
Creating bokeh in your images is simple but there are a few things you do need to take into consideration to achieve it, such as camera settings, the lens, the distance between you and the subject, the distance between the subject and the background, and, finally, the background itself.
Let’s take a look at each of those in a little detail.
Best camera settings for a smooth, blurred background.
Let’s start with the camera settings. Your aperture is the first thing to consider when trying to blur parts of an image. Basically, the aperture is like your pupil where it opens and closes, changing its size and, as a result, letting in varying amounts of light, depending on what is needed at the time.
If you open the aperture wider, it lets in more light all at once, and that essentially helps blur the out-of-focus parts of your image more. The larger the aperture, hence the smaller the number, the more it will help bokeh.
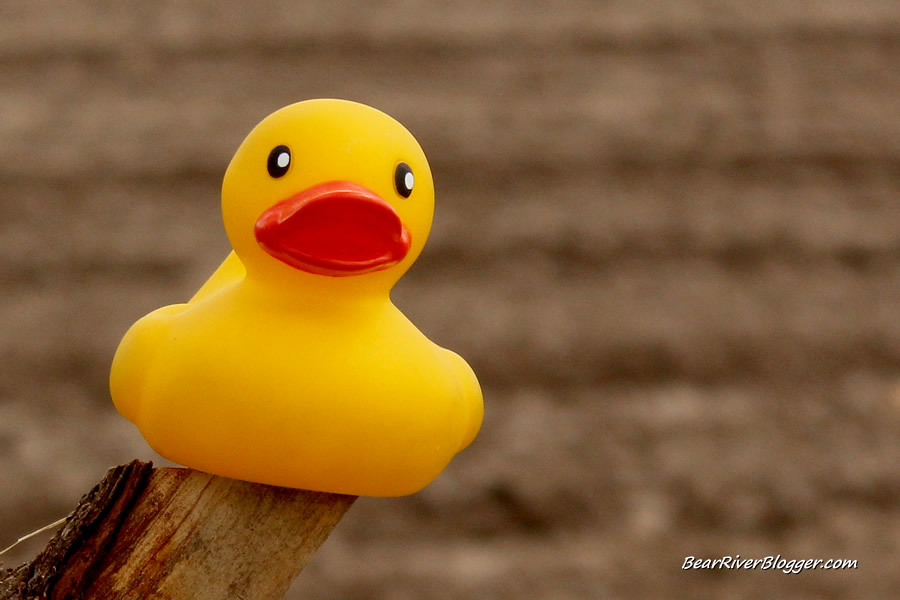
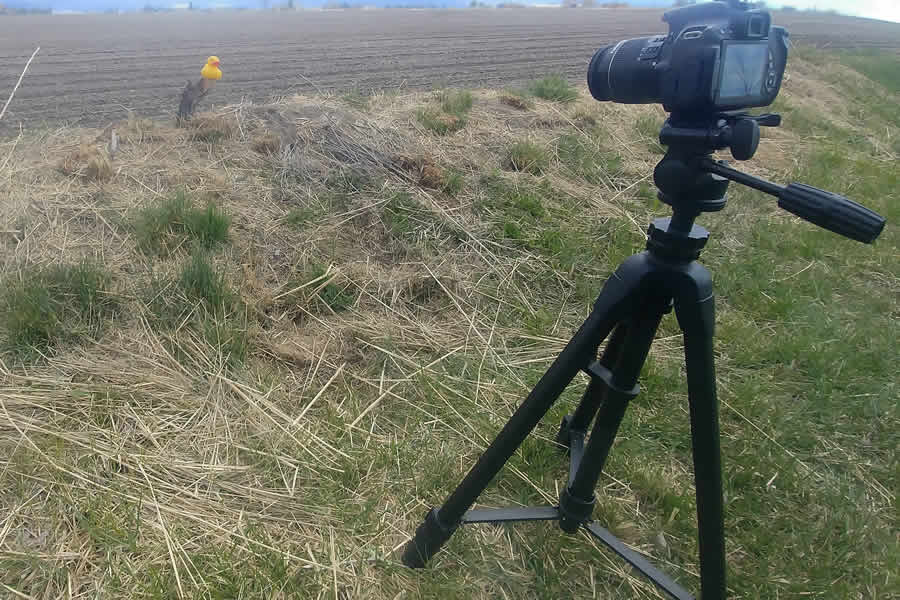
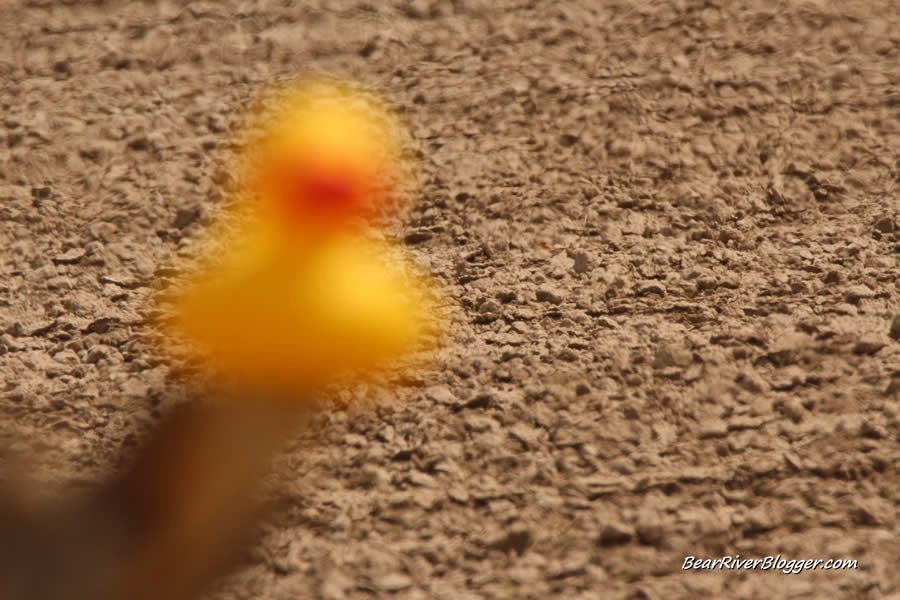
This morning, in an effort to visually depict what camera settings and lenses will help blur the background, I took a series of photographs of, well, a rubber duck in my yard. Yes, I will admit, it’s a strange thing for a middle-aged man to be doing but I needed a subject I could control while taking a number of photographs with different lenses and camera settings. The little yellow fella fits the bill perfectly and he will help tell the rest of the story here.
The camera settings for this first image are as follows, f/6.3, Iso 400, and 1/2500. I was using my 600 mm lens for these images, but we will get into how the lens affects the blurring in a moment. You can see it has a very nice, smooth background, all in all, a nicely blurred image.

For this next image, the camera settings are as follows, f/20, ISO 400, 1/250. Once again, I used the same 600 mm focal length and you can see a slight difference in the background blur but not a huge amount. This is, in part, due to the effect of the 600 mm magnification level I was using.

As you can see, the aperture setting by itself with such a big lens doesn’t change much. This particular lens’s aperture doesn’t go below 5.6, however, and a really wide setting of 1.2, or something similar, would have had more of an effect but probably not very drastic with this big of a lens.
Which type of lens is best for the smoothest of backgrounds?
As you can see from above, your lens has a big part to play in achieving a blurred background and foreground in an image, depending upon its magnification. The higher the magnification, the more it enhances the blurred effect in the image from the aperture setting. This is rarely talked about in bokeh articles, but the lens magnification does have a big impact on how smooth the background is blurred.
When I looked up the topic of bokeh on google, almost all of the blog posts I came across talked about the camera’s settings with regards to the aperture, otherwise known as the f-stop. Aperture does, indeed, play a part in blurring the background but that alone doesn’t tell the whole story, especially for those really wanting to create a smooth, painted type of background in their images.
Truth be told, the lens has just as much to do with bokeh as the aperture does, maybe more in some cases depending on what lens you are indeed using. When photographing butterflies, for example, I am almost always using my 150-600 mm lens for several reasons.
First and foremost, it allows me to take images further away without distracting or chasing off the subject. Having more magnification allows me to zoom in on the subject and get a lot of detail while not having to crop down so much.
The second reason I love shooting with a large lens is the bokeh effect higher magnification naturally brings to the table when photographing subjects in nature. Whatever aperture setting your camera is set at, blurring the background can greatly be enhanced with more magnification.
Take a look at this next image, basically the same shot but with a completely different lens and focal length. I was using an 18-55 mm lens and it was photographed at 55 mm with the following settings, f/5.6, ISO 400, 1/2000. Compare it to the above images.
This is the difference between a 55 mm lens and a 600 mm lens with almost the same aperture setting. Lens magnification does affect the background blur a lot, and you can see why I love shooting with a big lens.
Now there are downsides to using a big lens, and the most obvious is it robs you of some light when you zoom in. This usually isn’t a big issue unless you have a really cloudy day or your background is super dark, making the camera run a bit slower than you would like.
A tripod or monopod can help in these situations with slower shutter speeds, so the trade-off between light for background blur is one I will almost always make for my images whenever I can.
The distance between you and the subject.
To blur the background, start by being as close to the subject as you possibly can. Nature photography doesn’t always allow you to choose your spot, but when you can, get as close to your subject as you can. This will inherently help with blurring the background a bit more.
The type of lens will dictate, however, just how close you can get to the subject, mind you. Another drawback of large magnification lenses is you can’t shoot, more precisely focus, as close to a subject as you can with a smaller lens.
The distance between the subject and the background.
Another thing to consider is the distance between your subject and the background. If at all possible, place yourself and the subject to where you can have as much distance as possible between it and the background. The more distance there is behind a subject, the more the camera and lens will blur the background.
As with the distance between you and the subject, this isn’t always possible in nature photography, but when it is possible, making the effort here will greatly enhance your image background blur.
Consider the background itself.
The best way to say it is, if you start off with a smooth background, then your images will have a smoother background. That is, of course, if that is what you are going for. When I photograph birds or butterflies, for example, and I want a super smooth background, I always consider the background and if it has a lot of contrast or not.
Backgrounds with a lot of dark and light contrasting areas, such as shadows, for example, won’t make for a very smooth, even background, and it might end up being very distracting in the end. I always consider my background whenever I can. I look for angles with little to no high contrast in the background and few, if any, lines or shapes. The less busy your background starts out with, the more you will end up with a pleasant background.
For the rubber duck images here, I used a plowed farm field as my background, and, as you can see, it ended up being a nice backdrop, offering very little in the way of distracting blurbs in the image. I always look at my background when I am out photographing, but it isn’t always possible to choose what you get to photograph against when you are taking pictures of wildlife.
Conclusion
Try using bokeh in your photography endeavors. When used properly, it can greatly enhance almost any subject by bringing it to our attention first and foremost when we look at the image.
It does take a little practice to get used to what backgrounds work better than others and what camera setting and lenses to use for which situation but, all in all, it is a fairly simple technique to quickly add to your photography efforts.
As always, I appreciate your readership. Feel free to share this blog post with others that might find it useful or entertaining. I hope you will consider subscribing to my website by going to the subscription page and filling out the short form for email notifications for future blog posts.
(Advertisement)