Taking photographs of birds in flight is a challenging and sometimes very frustrating endeavor. Trust me, I know from personal experience as I spend countless hours behind a camera each year on the Bear River Migratory Bird Refuge.
Many of those hours are spent trying to photograph flying birds, especially the American white pelican which spends the summer foraging on the refuge for fish.
(Birdwatching T-shirts)
(Shop Bear River Blogger's Online Store)
Over the years and thousands and thousands of bird photographs later, I have figured out a few things about bird photography that has helped me take better photographs of birds in flight.
In a nutshell, I learned the shutter speed and other settings I was using for landscape or portrait images were in no way suitable for flying birds.
It actually took a full summer many years ago, in fact, of me literally sitting next to a hummingbird feeder, day after day, week after week, all summer long while taking hundreds of pictures a day to figure out once and for all why my bird photographs weren’t coming out as good as I wanted.
It basically came down to my camera settings were all wrong for bird photography, and I hope this blog post will help you learn what took me a couple months of trial and error in my front yard to understand.
Today, in an effort to obtain new images specifically for this blog post, I went to the Bear River Migratory Bird Refuge to try and photograph American white pelican in flight.
(Gosky Spotting Scope)
(As an Amazon Associate, I earn from qualifying purchases.)
The images are low resolution in an effort to not slow down this post while loading, but they do give a good representation of what I am referring to in the post.
Light
Before we get into the camera settings for bird photography, a quick mention about light and how it affects our efforts to photograph birds in flight is in order.
Everything we do with regard to photography is governed by the amount of light at our disposal. Light, more precisely the amount of available light, affects all the camera settings we need to understand and adjust to get a properly exposed image.
The amount of light also has a direct effect on what we do with those camera settings if we not only want a properly exposed image but also want to stop motion, like a flying bird, for example, at the same time.
The basic rule about light is the more light we have at our disposal, the easier it is to stop motion with our cameras. This simply means sunny days are better for bird photography than cloudy days.
Clouds act as a filter and restrict the amount of light reaching the camera sensor and will, in turn, affect the settings we need to catch a bird in flight.
That doesn’t mean, however, we never go photograph on cloudy days. It just means we have to set our cameras differently to compensate for having less sunlight at our disposal while trying to maintain the same camera speed a bright and sunny day would have given us.
The same concept applies to what most photographers call the “golden hour”, the first two and last two hours of the day when the sun is at a low angle and gives the scene in front of you a bit of warmth as opposed to the harsh noonday sun.
The light at these times of day is by far more appealing, but there is less of it so camera settings do need to be adjusted accordingly, especially when photographing birds is in order.
Shutter Speed For Bird Photography
By far, the most important setting for photographing birds in flight is the shutter speed. To photograph birds in flight while stopping wing motion, the best shutter speed is 1/2500 of a second or even faster if possible.
(Shop Bear River Blogger's Online Store)
(T-shirts, Hoodies, Greeting Cards, Blankets)
When photographing hummingbirds, some of the fastest wingbeats in nature, I have had some images photographed at 1/4000 of a second and still had some wing blur, so you can never have your shutter speed too fast when it comes to bird photography.
This, of course, depends on what we mentioned earlier regarding the amount of light that is available. Bright sunny days will allow you to photograph with a faster shutter speed than on cloudy days.
You can compensate for this with a couple other camera settings we will get into in a moment, but the best days to photograph birds in flight are sunny days with little to no clouds blocking the sun.
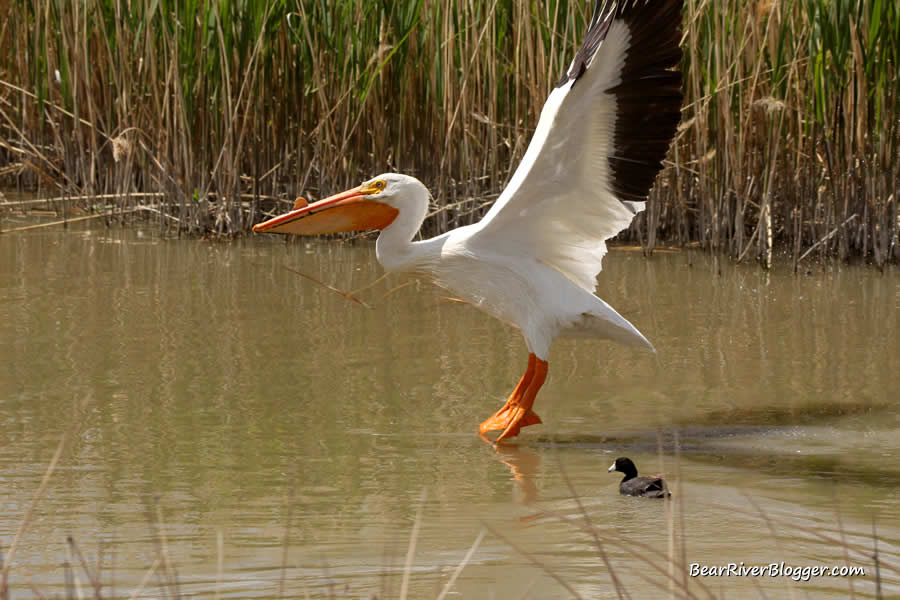
Although mid-to-late summer is the best time to photograph pelicans on the Bear River Bird Refuge, today I did find a couple of pelicans that gave me an opportunity to capture a few photographs for this blog post to detail what I am describing here.
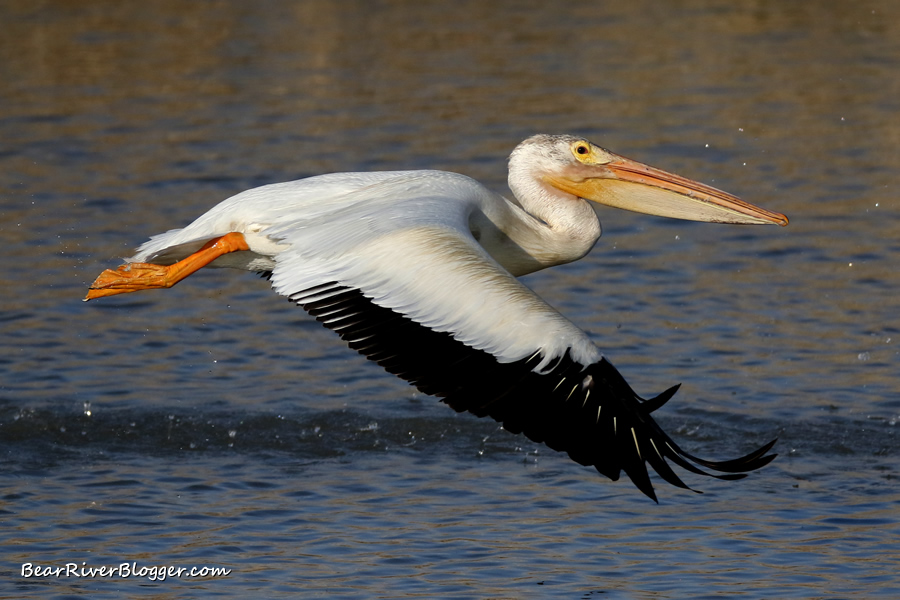
This pelican image was photographed at a shutter speed of only 1/2000 of a second, and at first glance, it looks pretty good.
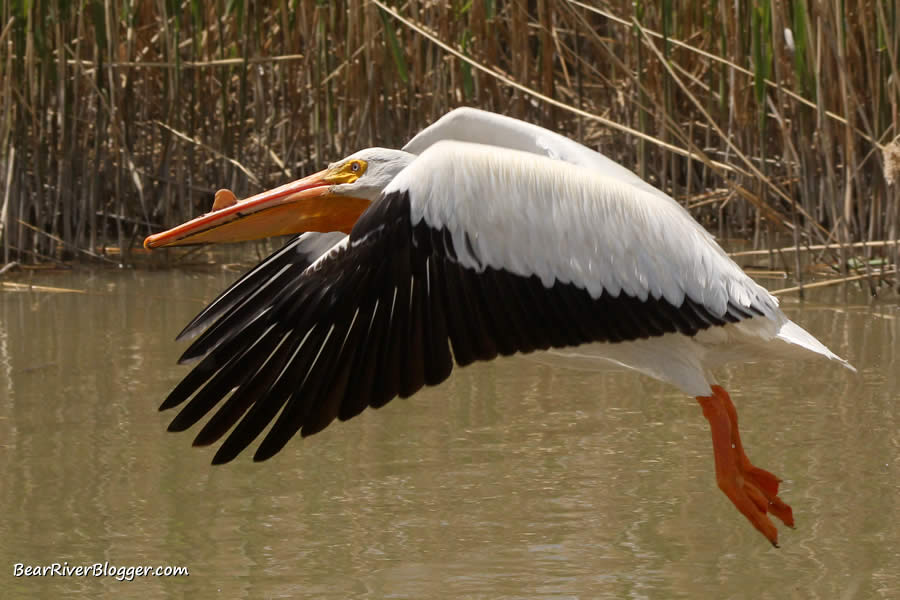
The head is clear and sharp and it has good detail but upon closer inspection, the wings do have a bit of blur from the shutter speed not being fast enough to stop the wing motion.
A faster shutter speed would have made this image, particularly the wingbeats, a bit more crisp and sharp.
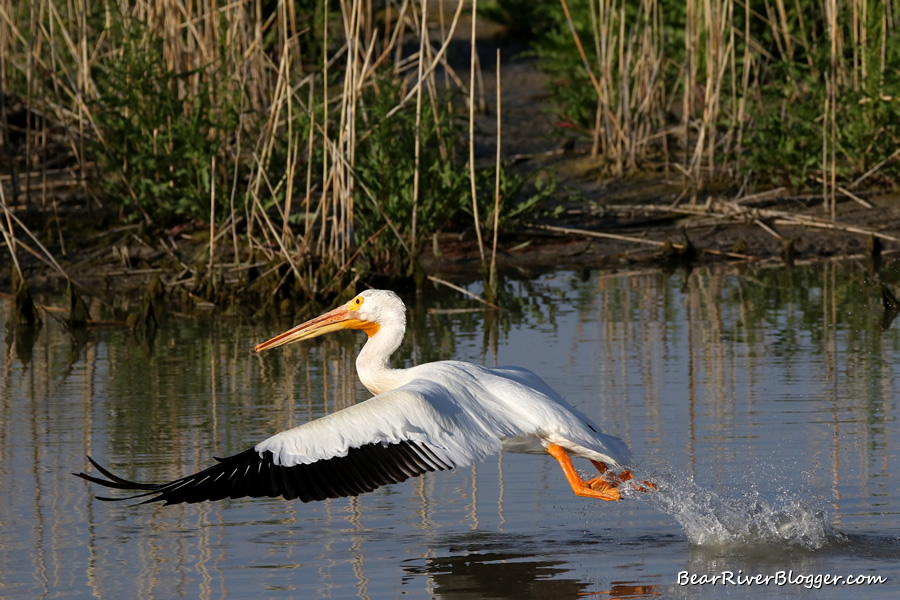
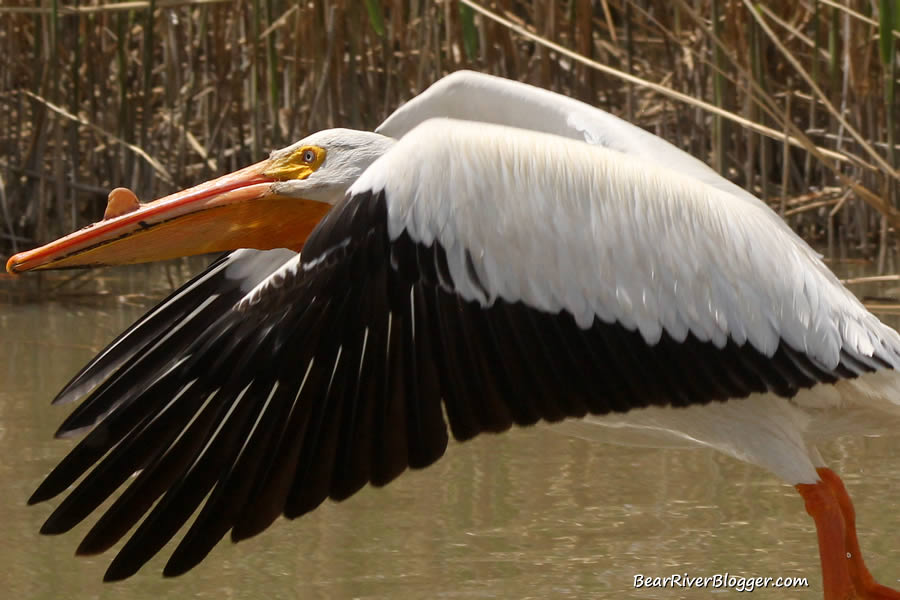
In contrast, the following photograph was taken a few moments later at a shutter speed of 1/3200 of a second and the wings are a lot crisper with respect to motion.
All in all, both images are pretty good but the one photographed at a faster shutter speed is the sharper image. Lighting was great today with only a small stray cloud here or there, well away from blocking any direct light from the sun.
Aperture Mode
DSLR cameras have several partial modes where you can set some of the functions and the camera sets the others. Hands down, aperture mode is the best camera mode for wildlife photography.
Aperture mode is one of them where you get to set the camera aperture or the amount of light that is allowed to go through the lens.
The best aperture setting for bird and wildlife photography is f7.1 to f8.
Your camera aperture acts a lot like the pupil of an eye where it opens and closes and either lets in more light or less light, depending on how big or small the aperture opening is.
For flying bird photography, the aperture value mode is the best camera setting and is hands-down my camera mode of choice for this circumstance. You can also use time value mode, and we will get into that next, but I prefer to use the aperture mode for two reasons.
Aperture mode will allow me to increase the amount of light reaching the sensor, forcing the camera to run at a faster shutter speed when the aperture is very wide. Even on sunny days, I usually photograph with an aperture of f8 or even wider to get a fast shutter speed.
With regards to the previous images, the faster shutter speed was achieved by a larger aperture, allowing more light to hit the sensor and forcing the camera to run faster.
In aperture mode, I get to choose the aperture setting and the camera chooses the shutter speed depending on how much light I let in with the aperture and ISO settings. So, in essence, I can affect the shutter speed with more light and make the camera run faster.
On cloudy days or real late or early in the day when light is lower, I have to open up the aperture as far as it will go to let in as much light as possible to help bump up the shutter speed.
When this isn’t enough for the amount of light we have, bumping up the ISO is also an option and we will get into that in a minute.
The other reason I prefer to use the aperture mode is by using a large aperture, I can help blur the background a bit more which helps make the subject stand out a bit more in the image.
Blurring the background is affected by more than just the aperture, however, but by using this setting to my advantage I can help dictate to some degree what the background is going to look like.
Time Value Mode
Another mode that is useful in photographing birds is the time value mode. This mode lets you set the shutter speed and the camera sets the aperture.
It’s the opposite of the aperture mode if you think about it.
The advantage of this mode is you can always set your shutter speed at a certain point, like 1/2500 for example, and know that it is always there.
The downside is if the light changes the camera will change the aperture setting and you have no real control over blurring the background, an effect I really like in bird photography.
On bright and sunny days the camera will choose a smaller aperture setting, as there is enough light for the chosen shutter speed and there will be less background blur.
On days with less light, the camera will automatically open the aperture and let in more light, thus helping blur the background more.
So, you see, time value and aperture value modes both have their advantages and disadvantages regarding how we can affect the final outcome of the image.
My suggestion would be to try both and practice with both settings and see which one you prefer and feel the most comfortable with and stick with that.
Continuous Shooting Or Burst Mode
Photographing birds is a lot different than doing landscapes or portraits where you can take your time and set up the shot and casually take one image at a time. With bird photography, you need to take a lot of pictures quickly to capture the action you want.
This requires setting your camera to burst mode, meaning where the camera takes a string of images in quick succession by just pushing and holding down the shutter button once.
Some cameras only take 4-5 images per second and others can take twice that many, but no matter what DSLR camera you have if your going to take flying bird pictures, set your camera to burst mode so you can take a rapid succession of images when the action is happening.
You can always take one picture at a time when needed by quickly taking an image and promptly releasing the shutter button, but have your camera set to burst mode and leave it there when you know you are going to be taking bird photographs.
Trust me, it will save a lot of aggravation down the road if you set your camera to burst mode and leave it there before you start your day photographing birds as opposed to trying to go back and forth with the camera settings.
You will miss some great shots if you try to go back and forth by not being ready when something unique happens out of the blue, and it will if you spend any amount of time out in nature photographing birds.
So just take my advice and put your camera on burst mode while photographing birds and just leave it there.
ISO Settings.
The third camera setting we can use to our advantage while taking bird photographs is the ISO setting. This, in a nutshell, refers to how “sensitive” the camera sensor is to light. The higher the setting, the more light it will capture.
If you are one that remembers the days of film photography, the ISO refers to the different grades of film and how each grade captured light. A 400 ISO captures more light than 100 ISO but the trade-off is the film had more silver granules and that showed up in the images with a higher ISO film rating.
A similar situation occurs with our modern DSLR cameras, but it isn’t film grain but rather small imperfections in the camera, sensor, lens, and so forth that add noise to our images, those annoying little bits of grainy appearance in our images when we use a higher and higher ISO.
I personally never like to photograph anything over 800 ISO but I have had some decent results a few times at 1600 ISO but not enough to keep photographing at such a high level.
The higher the ISO setting, the more camera noise will be introduced into your images so try and keep your ISO setting at 800 or lower. I actually try to photograph at an ISO range of 400 to 640, depending on what camera I am using and what ISO settings I have available.
Cheaper cameras, like my old Canon Rebel, jump from 400 to 800 ISO with nothing in-between while my Canon 7d MkII has 400, 500, 640, and 800 so with that camera I try and leave it at 500 or even 640.
Overall, the best ISO setting for photographing birds in flight is 640, if your camera has that level, that is. If not, set the ISO to 400 and work with the aperture or shutter modes to achieve the desired results.
Set your ISO setting at a fixed level and leave it. Never let it be on auto for the setting or the camera will be able to choose the ISO setting for you and it will oftentimes pick a higher ISO setting than you will want, thus introducing more unwanted noise into your images.
This is especially true for both time value and aperture modes. If you allow the camera to run on auto ISO, it will change the ISO in the background and you won’t have as much control over your images as you should have.
Picking an ISO and setting it at a fixed level forces the camera to only change one setting while you get to change the other two. It gives you much more control over your images and will allow you to more easily photograph birds in flight.
For most of the time with sunny days, an ISO of 400 is ample enough with a sizable aperture to photograph birds in flight. On cloudy days, I will bump it up to 800 when needed but prefer to not go any higher if at all possible.
Conversely, while photographing birds, I never go below ISO 400 either. I want the camera to run as fast as it can, which is the total opposite strategy when I photograph sunsets, waterfalls, or portraits where I oftentimes go for a lower ISO setting when possible.
AutoFocus Points Selection
Another setting you need to consider is the (AF) autofocus point, or in other words, the spot the camera uses to focus on the subject.
Some cameras, like my old Canon Rebel T4i, have a limited AF point selection, allowing for only a single point to grab the subject. You can choose from several locations around the viewfinder but you are limited to using just one of these points to grab and focus on your subject.
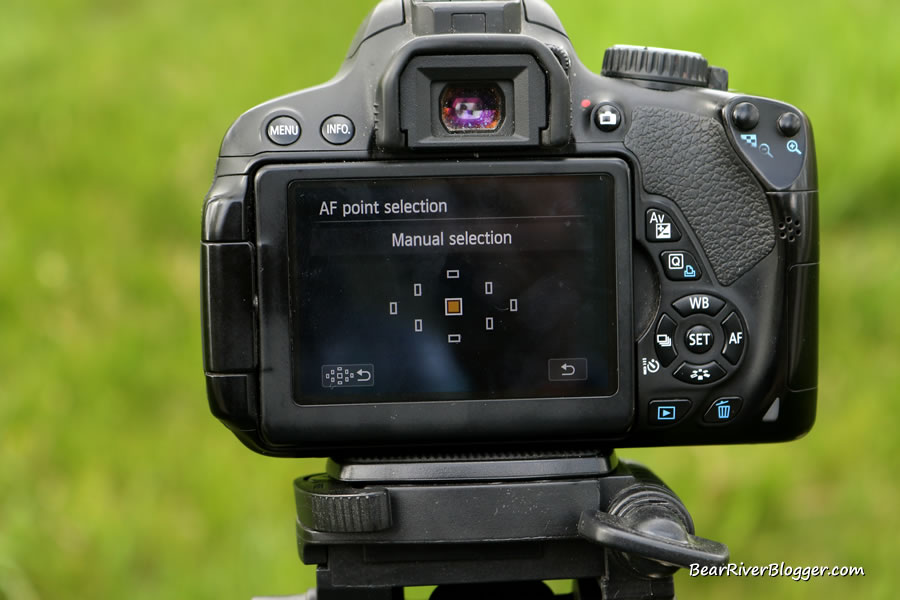
In contrast, my Canon 7D Mkii has the ability to have not only a single AF point but also a variety of different sized groups of AF points to grab the subject.
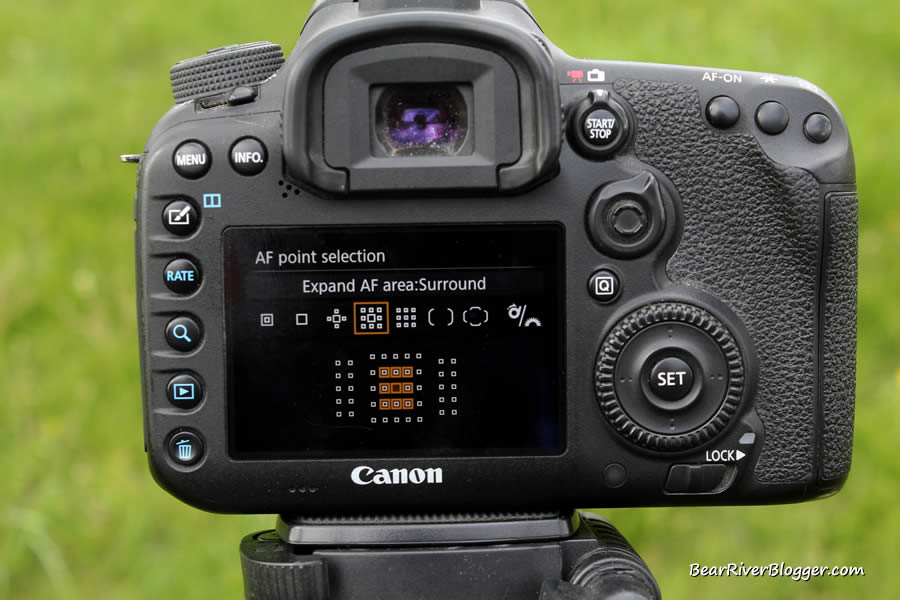
Having a group of autofocus points can make the job of photographing birds in flight a lot easier but it can be done with a single AF point with a little practice and patience.
Group AF points do have their drawbacks, however, when photographing flying birds. Sometimes while using a large group of focus points, the camera will grab an area behind the bird instead of focusing on the bird.
If your camera has the capability of utilizing groups of autofocus points, use the smallest group you feel comfortable using so the camera won’t accidentally focus on something other than the subject.
Zoom
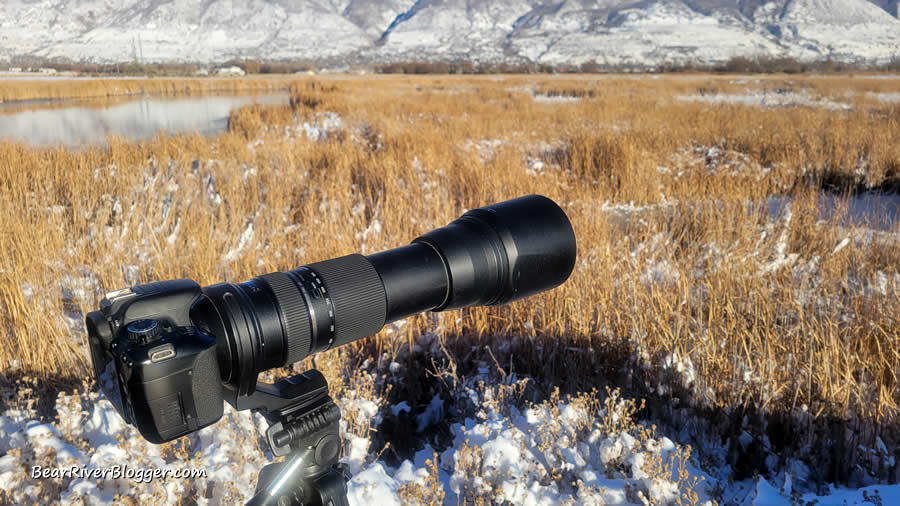
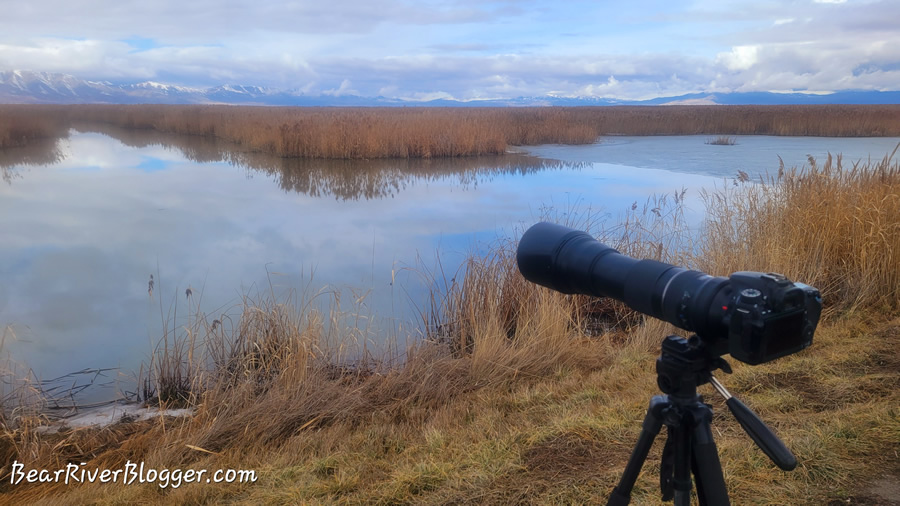
With the advent of a variety of inexpensive 600 mm lenses on the market, such as the Tamron 150-600mm camera lens, the lens I currently use for bird photography, we oftentimes try and over zoom on a subject and, as a result, leave little to no room for what I refer to as “compositional cropping”.
Resist the temptation to try and zoom in super close when photographing birds, especially birds in flight. Leave some room around the subject so you can crop the image in a more pleasing manner.
Almost all of my bird photographs are cropped for composition in some manner. I try to find the right balance between getting close enough to not have to crop too much while leaving enough room to play with the rule of thirds, a topic for another blog post for another day.
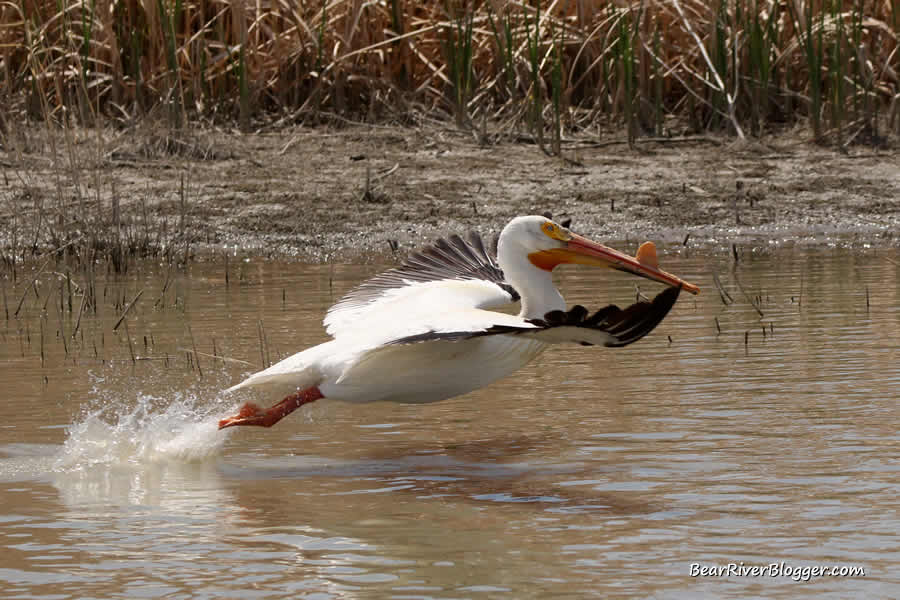
But even with these well-mannered intentions, I sometimes find myself using too much magnification and either lose the opportunity to crop or even cut off part of the bird in the photograph, as I did with this American white pelican photographed on the Bear River Migratory Bird Refuge today.
It is quite tempting to zoom in so close the bird fills the frame but resist that temptation and leave some room around the subject for cropping during editing.
Another small but important effect over-zooming can have on your images is the more you zoom, the less light will indeed reach your sensor. I’m not sure why this is but when you zoom in, it will affect and reduce the light hitting the sensor to some degree.
It’s not a lot but in low light conditions, we need every ray of light possible so it can, at times, adversely affect your image. There have been a few times I had to decrease my magnification a bit to let in more light on extremely cloudy days.
Camera Gear
I use the Tamron 150-600 mm lens for bird photography and have used it for several years now with 3 different Canon cameras, including the Rebel T4i, 70D, and 7D MKii.
It has given me some great images with all three cameras and all of the bird images on this post, as well as many of the images on this entire blog, were taken with the Tamron 150-600 mm lens.
Conclusion
In summary, the single best thing you can do to instantly start taking better bird photographs is to increase your shutter speed to 1/2500 or faster when at all possible.
Your shutter speed is governed by the amount of light reaching the sensor and to obtain faster shutter speeds you may need to increase your ISO, open up your aperture, or both when light is being hindered by clouds or you are photographing very early or late in the day.
Subscribe
I appreciate your readership and offer you to subscribe to my blog so you can receive email notifications when I post a new article.
(Advertisement)