Contrary to what other photographers want you to believe, there is no secret sauce with regard to great bird photography.
Simply put, better bird photographs will only come from practice, perseverance, and, most importantly, patience.
Yes, practice, perseverance, and patience are what hold us back from becoming better at, well, just about anything in life, including photography.
I listed patience as the most important because if you don’t have patience as you work through the frustrating piles of photos, day after day, week after week, month after month, seemingly with no end, and there will be many of those, trust me, you will give up long before the really good photos start to come in, and they will in time if you’re patient and work through the inevitable learning process.
There are no magical camera settings that work in every situation but what does work is getting outdoors and pushing the shutter button, over and over again, whenever you can, practicing as much as possible, and coming home afterward to evaluate what you did right as well as what you did wrong.
One summer many years ago, I spent several hours a day all summer long sitting in my yard by a hummingbird feeder photographing every bird that came to fill its belly on my sweet, sugary offering.
And to be quite honest, it was the best education I ever had with regard to bird photography.
Nothing beats going out and practicing over and over until you get it right because when you finally do get it right, you truly know what you did wrong and what you are doing right.
Books, videos, and blog posts can only get you so far, you still have to go through the trial and error phase of actually applying and learning by experience when to use what in various photography situations.
Now with that said, I will say there is one hard, fast general rule I will give you that will greatly speed up your bird photography journey, no matter what always photograph birds with the fastest shutter speed the current lighting situation will allow.
And the reason for that is typically when people say they are getting “soft bird images” it often comes from slight, ever so slight camera shake when photographed with a slow shutter speed.
I will whole heartily admit coming into this with a landscape photography mindset and background, that was definitely one of my early struggles when starting to photograph birds many years ago.
I’d be willing to say camera shake is the number one reason an image is not crisp and sharp if it was photographed with a slow shutter speed.
And it seems to be a much greater problem when using a 600mm lens, a common piece of camera gear many bird photographers, myself included, use for photographing our feathered friends.
So what is considered a “slow shutter speed”?
Well, anything under 1/1000th of a second is what I personally call a slow shutter speed.
When photographing birds I try to have my camera running at least 1/2000th of a second, preferably much higher if lighting allows for it.
Take a look at this American white pelican photo I captured a couple days ago on the Bear River Migratory Bird Refuge auto tour route, a fantastic place to practice bird photography during the entire year, especially during the summer months when pelicans are quite common.
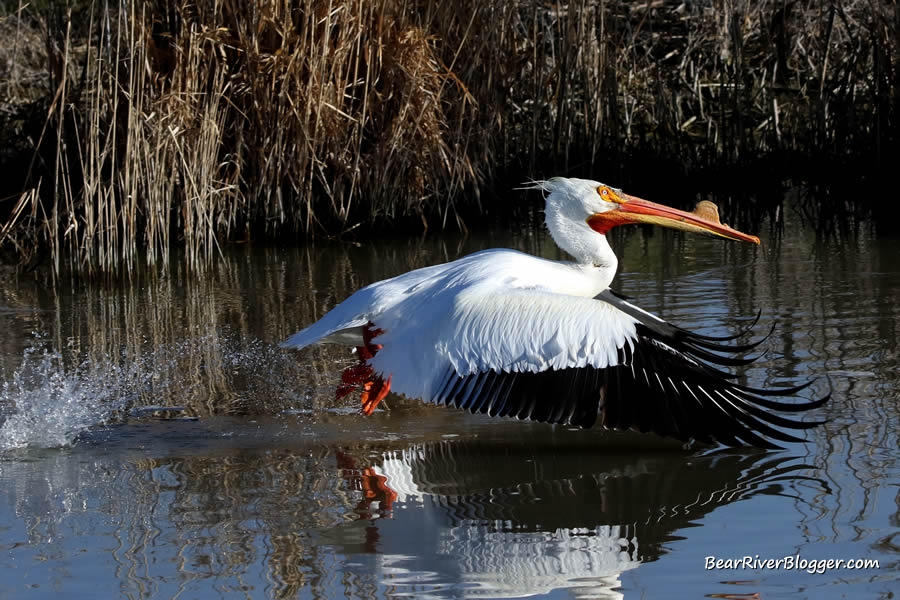
With a sunny day, aperture at 7.1, and the ISO set at 640, I was able to photograph this pelican at 1/2500th of a second shutter speed, fast enough to stop most of the wing and water droplet motion.
All in all one of my best ever flying pelican images that definitely would not have happened if my shutter speed was any slower.
If it wasn’t a full sun kind of day, one with clouds and as such reduced available light, I would have had to either photograph it with a higher ISO, adding more noise to the image, or photograph it at a slower shutter speed and take what wing blur it most likely would have given me.
So there are times when super fast shutter speeds are hard to come by without some of the other pitfalls of photography and that is why I hate photographing birds on cloudy days.
Besides using a faster shutter speed, the second tip I want to pass on is don’t photograph looking directly towards the sun.
Take a look at this next image, another American white pelican photographed in flight on the famed Bear River Migratory Bird Refuge auto tour route.
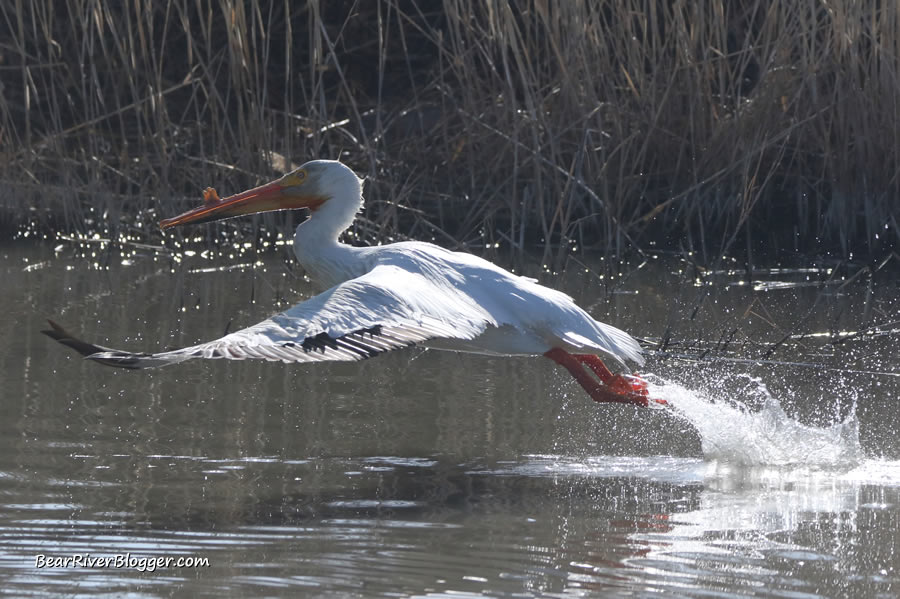
Do you see one big startling difference from the previous pelican image?
Both pelican images were taken on the same day about an hour or so apart from one another but the direction of the sunlight was completely different and thus the second image is not nearly as good as it could have been.
In the first pelican image, I had the sun mostly coming over my shoulder where most of the light was bouncing off the bird and coming back towards the camera whereas in the second image, I was shooting almost directly into the sun where not nearly as much light was on my side of the bird and not coming back to be captured by the camera.
Look at the difference in the heads and beaks, the second image has the head and beak shadowed a bit and shows a slight “halo” effect where the backlighting from the sun silhouetted the bird.

Compositionally and otherwise, both images are technically correct and quite good from that perspective but it’s the lighting that makes and breaks both images, respectively, in my opinion.
So what I am saying here is, whenever possible, photograph birds with the sun over your shoulder to get the most light coming off of the bird and back to the camera sensor.
Add just those two tips to your bird photography repertoire and your images should instantly get better.
When I go out photographing birds, those are the two things I concern myself with the most, how fast can I run my shutter speed and what direction is the sunlight coming from.
(American White Pelicans Feeding. For short nature clips like this one and interesting stories about the natural world around us, check out our Bear River Blogger channel on YouTube for videos and updates from our travels while out in nature.)
And for a third tip, I usually stop somewhere along the way to the Bear River Bird Refuge (or wherever I am headed) to take a test shot or two in order to check my available light and camera settings.
So don’t hesitate to take a couple test shots to get things dialed in before you come across something interesting to photograph because it will save a lot of headache and grief later on when you come home and realize you missed what could have been a great bird image because your shutter speed was set too low.
If you’re like me, an avid birder, nature photographer, or just someone who loves to get outdoors, I offer you to head on over to our subscribe page and sign up for email notifications for future blog posts.
We also appreciate all the readership and support for our website that continues to help it grow, including all the social shares through your favorite social media outlets.
